WineKeeper Frequently Asked Questions
Setting Up WineKeepers | Light | Temperature | Maintenance | Wine

Setting Up WineKeepers
When the grey latex expansion washer slightly touches the inside of the bottle—able to swivel, but does not come out, give the thumbwheel one half turn tighter.
For all WineKeeper refrigerated units, other than the Magnum line, the space above is used to allow heated air to rise off the condenser coil, and therefore requires 12" for proper ventilation, with 1" on either side, and 3-4" behind the unit. To install a unit into a bar with less than 12" ventilation space above the unit, add a fan to pull heated air out and over the top of the unit. For help with installation questions, call WineKeeper at (855) 511-5113.
WineKeeper regulators control the gas pressure to 4-5psi. A very low pressure is required to effectively pour the wine and preserving remaining wine in the bottle.
Light
Light bulbs, which are on the 2-bottle side of a 4x2 cabinet, unscrew from the rear of the unit. Light tubes are held in place by two nylon clamps, connected using male / female plug connections on each of the wires. Unplug the unit, since there may be more than one electrical cord. Carefully separate the blue male connector from the blue female connector on each electrical wire. DO NOT PULL ON THE WIRE TO SEPARATE PLUGS, but use pliers instead. Slide the disconnected light tube to the left until it comes out of a retaining clamp, then slide the light tube to the right until it drops free. Reverse process to re-install.
The light switch for these models is located in the rear at the upper right corner of each refrigerator when viewed from the front of the cabinet. It is on top of the rectangular metal thermostat cover box. For more detail, see the specification sheet that is model specific.
The light switch is located on the metal temperature display plate mounted on the front of the cabinet.
Light tubes should last one to two years, but are susceptible to high voltage and electric surges. If the tubes consistently burn out prematurely, check to see if the electrical outlet is in the 110-115 volt range, and use an electrical surge protector.
Temperature
WineKeeper® sets the white wine compartment to 44°-45° F. The white wine thermostat has an operational range of approximately 42°-48° F. Thermometers read the air temperature, which fluctuates 4°-5° F as the refrigerator cycles on and off. The product temperature remains at the mid range of this fluctuation. If a warmer temperature is required, an optional dual range thermostat can be installed with a range of 46°-68° F. Adjusting the thermostat beyond its operational range will cause the refrigerator to lock either full off or full on, which causes the unit to ice up.
WineKeeper sets the red wine compartment to 62°-64° F. The dual range thermostat has an operational range of approximately 46°-68° F. Thermometers read the air temperature, which fluctuates 4°-5° F as the refrigerator cycles on and off. The product temperature remains at the mid range of this fluctuation. Adjusting the thermostat beyond its operational range will cause the refrigerator to lock either full off or full on, which causes the unit to ice up.
Dual range thermostats have a metal bulb 4" in length fastened to the back wall on the inside of the bottle compartment. A white wine thermostat has a small white tube inserted into the bottom of the white rectangular cover on the back wall of the bottle compartment.
Napa, Monterey or Sonoma Manual Defrost Unit
To adjust the temperature on manual defrost units, locate the thermostat adjustment knob inside the bottle compartment on the left side ceiling. To run colder, turn the knob clockwise, but do not turn it to max. To run warmer, turn the knob counter-clockwise. Each 1/16th turn changes the temperature approximately 3° F. Allow a minimum of 2 hours between temperature adjustments. Thermometers read the air temperature, which fluctuates 4°-5° F as the refrigerator cycles on and off. The product temperature remains at the mid range of this fluctuation. If the unit runs at the proper temperature for an extended period of time, and it suddenly or gradually strays from the optimal temperature, it may be a sign of a more serious problem, such as inadequate air flow, low refrigerant levels, or a compressor failure.
Monterey or Sonoma Auto Defrost Unit
To adjust the temperature on auto defrost units, locate the thermostat adjustment knob on the outside rear of the cabinet, covered by a 3.5" x 5" metal box adjacent to the light switch. To run colder, turn the knob clockwise, but do not turn it to max. To run warmer, turn the knob counter-clockwise as viewed from above. Each 1/16th turn changes the temperature approximately 3° F. Allow a minimum of 2 hours between temperature adjustments. Thermometers read the air temperature, which fluctuates 4°-5° F as the refrigerator cycles on and off. The product temperature remains at the mid range of this fluctuation. If the unit runs at the proper temperature for an extended period of time, and it suddenly or gradually strays from the optimal temperature, it may be a sign of a more serious problem, such as inadequate air flow, low refrigerant levels, or a compressor failure.
Magnum Unit?
The thermostat is located inside the refrigerator compartment at the back of the cabinet. Remove the four Phillips screws on the 11 1/4" x 11 1/4" louvered vent grill. The thermostat is the white box marked Danfoss with a knob on top. When viewed from above, turn clockwise to raise the air temperature, and counter-clockwise to lower it. Each 1/2 rotation changes the air temperature 2°-3° F. If the unit runs at the proper temperature for an extended period of time and it suddenly or gradually strays from the optimal temperature, it may be a sign of a more serious problem, such as inadequate air flow, low refrigerant levels, or a compressor failure.
6-10 bottle Magnums have a red wine compartment heating device to raise the temperature in the compartment if needed. The control knob is located on the back of the unit for rear-venting refrigerators, and behind the covered face plate on front venting refrigerators. Be certain the tear-drop shaped Plexiglas cover plates have been fully closed in the divider wall between the red and white wine compartments. Turn counter-clockwise to lower the temperature, and clockwise to increase heat transferred into the red wine compartment. Use a maximum 14 turn adjustment at a time, waiting a minimum of two hours between adjustments to allow the temperature to compensate.
Napa, Monterey or Sonoma
1. Inadequate ventilation to the rear coils.
2. Thermostat failure or incorrect adjustment.
3. Ice building up on the cold plate.
4. Compressor failure or refrigerant leak.
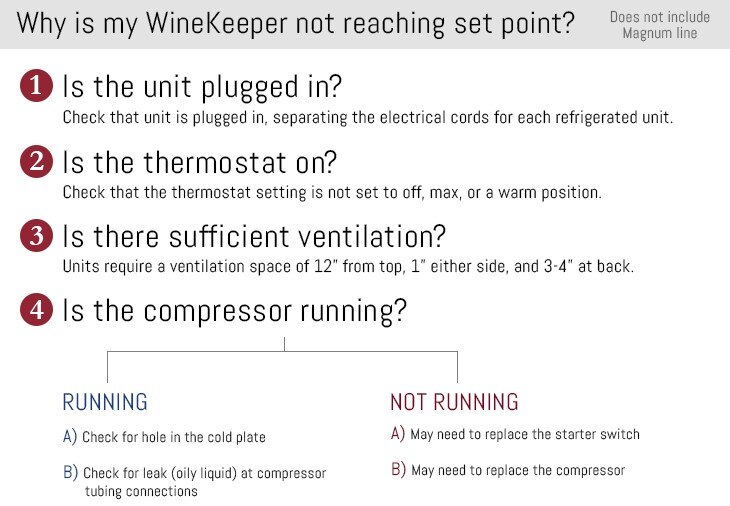
New units are factory set to 44°-45° F for white wines, and 62°-64° F for red wines, using separate thermostats. Proper vented air space is 12" above, 3-6" behind, and 1-2" each side. If the new unit has adequate ventilation and is running, but not getting cold, call WineKeeper for instructions. For older units, check and clean the rear coils. If a unit had been working properly, it is possibly having an equipment failure, rather than a thermostat maladjustment or ventilation problem.
Magnum
Most magnum cooling problems on new units are caused by inadequate air ventilation or maladjusted thermostat settings. Keep in mind new units can take up to six hours to cool down when first put into use. WineKeeper sets Magnum refrigeration units to run at approximately 42°-45° Fahrenheit. For slight adjustments, refer to your Operating Instructions. For adjustments more than 5°-10° degrees, contact WineKeeper. Minimum vented air space for a Magnum is 3-6" behind, 12" above, and 1-2" each side. If a new unit is not cooling correctly, note the running temperature on the digital display. Move the unit to a location that dramatically increases air ventilation, and let the unit run for one hour. If the temperature has dropped, the problem is ventilation. If the temperature does not drop, verify that both fans on the refrigerator are operating—one blowing into the bottle compartment and out the top of the white grate, the other blowing air out the top vent at the rear. If both are operating, call WineKeeper for assistance. In older units, follow the stops above, as well as removing the filter screen on the rear of the unit, since it may need to be cleaned. If these steps do not work, unplug the unit for two hours, then reconnect and note results. If this fails to fix the problem, call WineKeeper for further instructions.
Water inside a divided refrigerator is caused from moisture forming on the cold plate. If the drip tray is full, check the drain tube for an obstruction. It is important to make sure the door is closing correctly to ensure there are no air leaks. Leave the door open for a minimum amount of time when changing wine bottles and cleaning the interior. The amount of condensation will vary at different times of the year and geographic locations.
Plexiglas Magnum dividers can be repositioned to change the split between red and white wines. In most cases, they can regulate the flow of cold air into the red wine compartment. To reposition the divider, gently knock the bottom of the divider loose 3-4" from the silicone sealant that holds it in place. Twist the rear of the divider away from the back wall, and slide the divider to its new location. Use a razor blade to scrape away the old silicone. Stand the divider upright and square to the rear wall, then apply small beads of silicone along the bottom edge of both sides of the divider. Open the tear-drop shaped cover over the upper and lower holes in the divider to decrease the temperature in the red wine compartment. Close the covers to increase the temperature in the red wine compartment. If the red wine compartment remains too cold, see instructions under "heat pad adjustments".
Maintenance
The Magnum refrigerator air intake filter screen is located on the back of the cabinet on all rear-venting units. Front venting units do not use a filter screen. Once the filter screen is removed from its retaining clips, it can be cleaned in any conventional dishwasher. Dry the filter before re-installing.
Inspect the latex washers on each stopper assembly and the white nitrogen pinch clamps for wear or splits - replace as needed. Use silicone lubricant or mineral oil applied to O-rings on the inlet and outlet sides to increase longevity, and replace when showing signs of wear or cracking. Clean all parts that come in contact with the wine every 4-8 weeks, and clean the filter screen as needed. To clean a WineKeeper correctly, please refer to the WineKeeper Cleaning Instructions (pdf).
Loosen the stainless steel clamp joining the flexible wine tube to the stainless steel wine pick-up tube with a 1/4" nut driver or flat screwdriver. Leave the faucet attached to the through-wall. Grasp the faucet in one hand, and place a 1 1/8" wrench on the nut located directly behind the wing nut on the face of the cabinet. Turn ½" - ¼ counter-clockwise and remove wrench. Spin the faucet and through-wall assembly counter-clockwise while pulling gently away from the face of the cabinet. The through-wall will spin itself out from the face of the cabinet. There is a retaining nut on the inside of the cabinet under the inside insulation. If this nut turns with the through-wall, stop it from turning using your finger or a flat bladed wide screw. Pull the old through-wall and wine tube out from a hole in cabinet. Reverse directions to install.
Loosen the stainless steel hose clamp at the bottom of the clear wine tube and remove it. Carefully cut the wine tube off its white nylon barb with a sharp razor blade. Avoid cutting the barbed fitting itself. It is easier to remove the through-wall and tube from the cabinet before cutting off the old tube. Heat 1/4" of the end of the new wine tube in hot water, then quickly push the wine tube over the barb fitting. Mineral oil or food grade silicone lubricant will make this step easier.
Pinch off the nitrogen pinch clamp, and release pressure from the wine bottle before removing the complete assembly from the cabinet by loosening the hose clamp using either a slotted screw driver, ¼" socket, or nut driver. Pull the wine tube, with the hose clamp still connected, off of the stainless steel siphon tube that passes through the stopper assembly. Pull off the ¼" O.D. nitrogen supply line from the brass fitting on the rear of the stopper assembly. Before replacing the tube on the brass fitting, it may be necessary to cut off approximately 3/8" for a tight connection. After having completely removed the stopper assembly from the cabinet, grasp the stainless tube at the bottom where it is bent, and pull it out of the stopper assembly. Insert the stainless tube into the new stopper assembly, and use a little water to lubricate the first 3-4". Reverse steps to re-install.
Remove the stopper assembly, and carefully cut away the old latex washer using a sharp knife or a pair of side wire cutters. Heat the new latex washer in hot water for 1-2 minutes—the water does not need to be boiling—quickly take the latex washer from the water, and set it on a table top while it is still hot and wet. Holding the stopper assembly in one hand, quickly push the assembly down through the hole in the latex washer. If this does not work within 10-15 seconds, place the latex washer back into hot water and try again. Do not use any form of lubricant to help with this step. Pop the latex washer into place using your fingers.
1) Check the supply hose and tubing for cracks or holes
2) Check the WineKeeper regulator
1. Disconnect the quick-connect fitting on the supply tube where it joins the regulator.
2. Turn on the cylinder. (Make a note of the pressure registered on the regulator gauge).
3. Turn off the cylinder.
4. Wait 20-30 minutes, if the pressure registered on the regulator has dropped, the problem is in the regulator.
5. If the regulator is leaking, phone WineKeeper for repair/replacement options
3) Check the system (To test, connect to wine bottles with 2-3 ounces of liquid.)
1. Nitrogen supply line should be connected, and cylinder valve open.
2. Leave the valve open for 30 seconds to completely pressurize the system.
3. Close off the nitrogen pinch clamps. Stopper assemblies must be in the wine bottles and tightened down.
4. Turn off the cylinder valve and note the pressure on the regulator’s gauge.
5. Leave the unit undisturbed for 20 minutes.
6. If pressure drops, the problem is the supply line between the regulator and pinch clamps. Check the tubes where they pass through the cabinet for holes, cracks, or chafing.
7. Open and close each pinch clamp at a time, while observing the cylinder contents on the regulator pressure gauge. If the pressure drops while a pinch clamp is open, that is the problem. It could be:
- Stopper-assembly has not been tightened into the bottle
- Tube below pinch clamp has a hole
- Latex Expansion Washer needs to be replaced
8. Don't hesitate to call or live chat with WineKeeper for help when troubleshooting a leak.
Wine
Nitrogen, which comprises approximately 80% of the air we breathe, has no special merits as a preserving agent, other than it is inert; it has no odor, taste, or color and contains no oxygen. Argon has similar properties, but is slightly heavier than air, and forms a blanket between the surface of the wine and air trapped in the bottle. Neither gas has properties such as neutralizing or encapsulating oxygen, which can cause wine to oxidize. Argon is expensive, and often unavailable, but using it in a WineKeeper may slightly increase the wines' useful life. When sparging an opened and poured bottle of fresh wine, introducing a gas into the bottle to force out as much air as possible before re-corking it, argon out-performs nitrogen. View comparison chart of Nitrogen vs Argon in our tabletop size units
The length of time wine remains fresh in a WineKeeper will vary based on a number of factors: temperature, wine age, wine type, and the cleanliness of the machine. Wines should last approximately one to three weeks; some wines, such as ports and sauternes, will remain sound longer.
The movement of the liquid through the tubing and faucet creates a very foamy pour, so we do not recommend using sparkling wine with any of the WineKeeper systems.
Lack of maintenance and a dirty system can cause cloudy or flakey wine. Be sure the system is being used correctly and cleaned regularly.
If the WineKeeper unit has been working correctly for some time, but the quality of the wine has started to diminish, the system needs to be maintained more often. To clean it correctly, please refer to the WineKeeper Cleaning Instructions (pdf).
If no faucet / stopper appears to be working, it can be caused by:
- Nitrogen cylinder out of gas
- Nitrogen supply tube not connected to the regulator
- Nitrogen supply tube kinked or pinched
- White plastic nitrogen pinch clamps closed
- Stopper assemblies not tightened into the neck of the bottles
- Nitrogen cylinder not opened
- Regulator failure
If one or two faucets / stoppers are not working, it can be caused by:
- Stopper assemblies not tightened into neck of the wine bottles
- White plastic nitrogen pinch clamp closed
- Debris in bottom of stainless steel wine pick-up tube
- Kink or hole in supply line to the stopper assembly
Wine can drip when there is debris in the faucet or the bonnet is cross-threaded when not screwed down completely. Disassemble the faucet, and clean using warm water or Wine Line Cleaner, examining the seat cup for small cuts or tears. Reassemble the faucet, making sure the bonnet is not cross-threaded.
Tighten the stainless steel clamp that attaches the flexible wine tube #7900 to stainless steel siphon tube #7897.